This article explains how to use Webmail Basics.
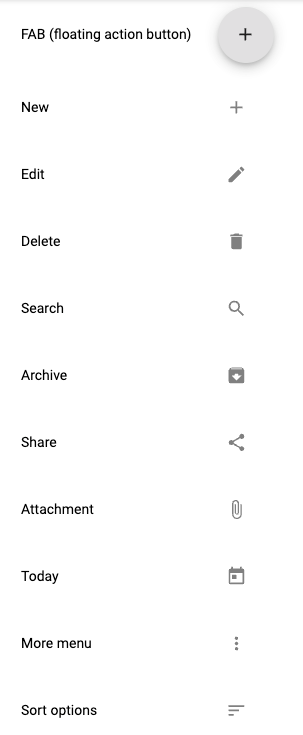
ICONS
GENERAL
- Language
You can change the language used throughout the webmail interface via Settings then select General
- Time zone
You can change the time zone used throughout the webmail interface via Settings then select General
ACCOUNTS
- Username only logins
At the login page you are required to use your full email address (username@domain.com) to log in.
For example, if your email address is user@domain.com then enter "user@domain.com" into the Email field. In either case your password is still required
-
One Time Passwords or Temporary Password
Upon setting up your account, loss of your password or for any other reason deemed necessary, the system administrators may assign you a "One Time Password", or OTP. This password enables you to login to your account via this web UI ONCE ONLY, upon which you will be presented with the dialog pictured below in order to set a new password for continued use. You must set the new password before you can continue using the application. Each OTP issued is only good for one login. If you do not set a new password after login and the session expires then you will require a new OTP in order to access your account again and set your new
- Performing bulk actions on emails
You will often want to perform an action on more than one email at a time. To do so you will first need to select the emails. To select an email, hover your cursor over the avatar on the email in the list, it will become a checkbox that you can click. Once clicked select mode will be activated and the checkboxes will display for all items. Check the checkboxes for all the emails you wish to select. If you wish to select a range of emails then simply check the first one in the range, hold down the SHIFT key then click the checkbox on the last email in the range. Doing this will select all emails in the range. Once you have all the desired emails selected you can then perform the action (e.g. click the delete icon or drag and drop to another folder etc). To cancel select mode without performing an action simply click the close (X) icon in the app bar
- Checking for new email(s)
Your inbox automatically updates with new email(s) as soon as they are available on the server
- How do I view email in different mailboxes and folders?
Click the mailbox/folder you wish to view in the side menu. Once loaded, click onto the email you wish to view
- Mark an email as important
You can star (and unstar) email(s) as important via the following methods:- Right click on a message in the list, then choose "Star/Remove star" from the menu
- Select the star icon next to the email you want to mark as important
- Right click on a message in the list, then choose "Star/Remove star" from the menu
- Block sender and Unblock sender
- Block a sender using the more menu on an individual email, this will automatically move all subsequent emails from the blocked address to the spam mailbox upon receiving
- Unblock a sender using the more menu on an individual email with an address that was previously blocked.
- When you block an address, it is saved to the manage spam settings blocklist found in mail settings. You can edit, add and remove addresses (and domains) directly from the list here
- Archiving email
This article outlines the different methods you can use to archive emails Archiving email
- Select all
Clicking on the icon next to the Inbox heading will present a selection of select options. When using these options, they will select all emails that fit the criteria. After a selection option has been chosen an email count of what has been selected will be displayed.
- Download and saving attachment
This article will guide you through how to Download and save attachment
- Composer toolbar
When composing a message, the composer toolbar provides functions to style text (bold, underline, italic), choose font size, type and colour, create ordered and unordered lists, clear text styles, trash the message, add attachments and more (via the more menu)
- Requesting read receipts and delivery status notifications
To request a read receipt or delivery status notification for a message you are composing simply click on the menu button that is integrated with the send button (down arrow icon), select the options you desire then click outside the menu to close it. Pills are displayed at the top of the composer to indicate which notification options are currently active for the message. Click on the "x" in the pill or uncheck the option in the menu to remove it. This article will guide you through how to Request read receipts on Webmail and Request delivery notification on Webmail
-
Replying to an email
You can reply to an email using the in-line composer placed at the bottom of the email. Select the Reply to drop down icon to change reply type (reply, reply all or forward) or edit the recipients
To reply to a specific email in a thread, select the More menu icon and choose Reply from this menu to reply to that specific email
- Formatting text
To make text bold, italic, or underlined choose the appropriate icon from the bottom toolbar in composer. More formatting options can be found by selecting on the More options icon on the composer toolbar. Alternatively, you can use the standard keyboard shortcuts supported in your operating system.
For example, simultaneously pressing Ctrl+B on your keyboard bold text - Spell checking
Your spelling is automatically checked as you type in the composer. Misspelt words will be underlined in red. Your computer's operating system determines the spellcheck language.
To modify this, you will need to change your system language in the configuration settings of your operating system such as Windows, Mac OS X, or Linux.
- Saving drafts
Drafts are auto saved as you compose your email. Go to your Drafts folder to view your automatically saved draft email(s).
- Organizing your inbox
- Marking email as spam
Select the email you want to mark as spam and then right click on the message in the thread list and select Report spam from the menu. Please note that using the Report spam button does NOT ensure that all following email(s) from that address will be treated as spam. You can achieve that functionality with the Block sender feature
- Moving messages
If you wish to move just one email simply drag and drop it to the folder, you wish to move it to.
If you want to move multiple emails then select the emails you want to move by hovering over the avatar on the email in the list and checking the checkbox that appears, then either drag and drop the messages to a folder or click the More menu icon from the top right toolbar on the screen. Click on Move to and select the destination folder then select OK to confirm.
Alternatively, you can right click on a message in the thread list and select Move to from the menu, then follow the procedure as above.
- Creating, deleting and renaming folders
- To create a new top-level folder simply click on the "+" icon to the right of the Folders heading
- To create a sub-folder, rename a folder or delete a folder simply hover over the folder in the list and the menu icon will appear. Select the icon and select the desired action from the menu
- You can also manage folders in Webmail by going to Settings, then Mail, and select Manage Folders
- To create a new personal folder, select the New Folder
- To rename an existing folder, select the More menu icon next to the target folder under Actions
- To create a nested / sub-folder, select the More menu icon next to the target folder under Actions
- To create a new top-level folder simply click on the "+" icon to the right of the Folders heading
- Empty trash
If Trash folder selected, you can empty trash folder by clicking on empty trash button. Please note that email deletion is permanent and email(s) cannot be recovered.
- Empty spam
If Spam folder selected, you can empty spam folder by clicking on empty spam button. Please note that email deletion is permanent and email(s) cannot be recovered.
- Auto deletion
Messages in the Spam and Trash folders will be automatically deleted after the specified number of days.
- Mark email as read after
This article will guide you through how to mark email as read after: Automatically mark emails as read after viewing
- Empty trash on signs out
When this setting is enabled, the Trash folder and all contents will be deleted on logout of your account. Please note that email deletion is permanent and email(s) cannot be recovered
- Blocking remote content
Email(s) can contain remote content such as images that can pose privacy risks. To block such remote content, go to mail settings and turn on Block remote content. When viewing email(s) you will still be able to click a button to view the blocked content if you so desire
You can also use the Remote content allowlist to manage which email addresses and/or email domains are ignored by the remote content blocker. If an email is from a user with an allow-listed address or domain then any remote content will be shown regardless of your Block remote content setting
- Unverified senders
If you see unverified next to a sender's name, please be cautious when interacting with the email as it might not come from who it says it does. As email is received, we check information within that email against information available in the sender's domain name records. If these do not match as expected, then we will display unverified next to the sender's name
-
Searching messages
To search for an email simply type what you wish to search for in the field above the email list.
An advanced search menu is provided by clicking the drop-down icon on the right most of the search input field. This allows searching on a specific set of fields such as to/from/subject/body and operators such as read/starred.
- Printing a thread
When viewing a message, select on the Print icon above the email you are currently viewing
Alternatively, you can right click on a message in the thread list and select Print from the menu
- Compose message full screen
Click the Expand icon in the top right of the email composer window
- Sorting messages
To sort email, click the Sort icon in the top toolbar. You can sort by Date, Size, From, To and Subject.
This article will guide you through how to Sort email